I have decided to revisit this and have gotten Jim Dorsett's Harmonious Confusion 1/12 Scale Roll Top Desk plans from Scale Cabinetmaker magazine.
 p
p
I also was lucky enough to be able to borrow a completed desk made from these plans to use as a reference during my build.


I made some errors in the first parts creation and took way too much space here to keep all the pix and error narrative in, so I am deleting a bunch of entries and will explain the errors with the fixes.
Knowing this would require many pieces with same measurements I upgraded a Harbor Freight Mini Chop/Miter saw. The process of this upgrade is posted previously here.

I started by cutting and thicknessing rough stock per the plan measurements.


The drawer parts all got a dado for the bottom boards, and while the plans call for simple drawer construction I am going to attempt to dovetail all the drawer fronts to the sides. I have two different scale dovetailers to work with.

A jig was made to dado the rails and muntins for the panels. I used a 1/32" bur in my Dremel shop built router table. This was a mistake resulting in raggedy flimsy dadoes. I later redid using a slitting saw and routing the tenons before slotting.
Routed the taper on the long edges of the drawer front stock, ends will get done after cutting to length.

Sanding afterwards cleans up the profiles.

Once all the stock is cut to width and prepared with dados and profile it was time to work out the chop saw. Again, in the final the stock was cut to length, tenoned, and then dadoed on a table saw.


The process produced a pile of parts and a bunch of scraps.
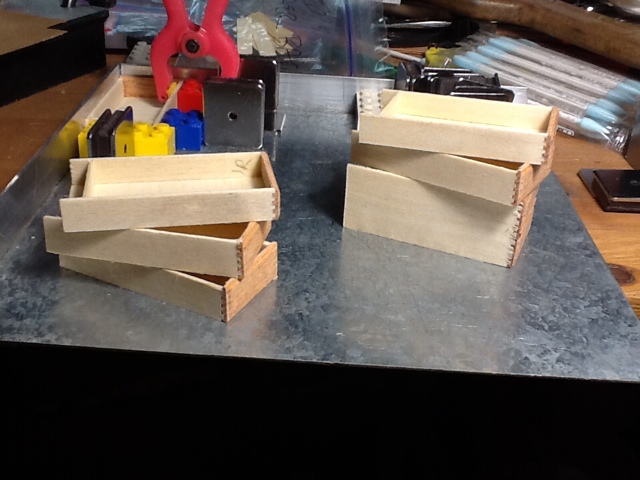
The drawer parts, sides, fronts, backs and bottoms. Drawer parts were usable.


This is going to be a project as if not more difficult as the Library Table build earlier.
9 Dec '15 update --
Best laid plans and all... I had to redo all of the rails, posts and muntins as the router bit I was using tended to get clogged and flared the cut causing the dado sides to be very flimsy. The other thing that happened, and another lesson learned is to rout the tenons BEFORE cutting the dados.
Pedestal parts from the initial run that all had to be redone....


Once the new pieces were thicknessed I did the tenons.

I put an 0.030" blade in one of the cheap tablesaws and with a cardboard surface was able to center the blade between a couple of glued on fences. This cut the dados faster and cleaner than the router did.

After fine tweaking of the shoulder to shoulder length of the muntin tenons and panels I glued up the back pedestal panel. Really happy with the look of the oak! The moisture is from cleaning off excess glue and has gone away.

Measuring the dimensions against the plans I am over 0.107" on width and 0.015" height, plenty of room to tweak sanding.
11 Dec update -
Back panel glue dry, outer side panels gluing.

12 Dec update
All 4 pedestal drawer compartment panels glued up.


I have to thickness wood for a new desk top as the measurements given were 1/4" too narrow, and I I missed the front to rear by 1/2".... After that and the tambour top piece are redone I think I will start on the drawers. The drawer supports and pedestals will be assembled after I have the drawers together so I can get spacing correct.
13 Dec update -
New desk top cut and edged. The quarter round extended edges will be worked on a bit more. The tambour top piece will have rounded edges without the top relief of the desk top.

14 Dec update - -
Started by profiling the sides of the drawer fronts.

And then..... the same thing that caused a redo of the desk top caused a need to redo all the drawer sides... about 1/4" too short. Back to the table saw and router.

Tomorrow will see new sides cut from the stock along with a number of sacrificial sides to adjust the dovetail apparatus on, and perhaps I can move onward with the drawers.
15 Dec update - -
Drawer sides cut and dadoed for drawer backs. Here is a left drawer side ready for dovetailing.

A batch of right drawer sides for the mid size drawers.

I neglected to thickness the drawer backs earlier, so I went back and cut new back stock, and ran it through the sander to 0.027" which matches the bottom piece thickness and fits the dadoes.
Setting up a drawer to measure for back and bottom width.

After i got the measurement for back width I cut a passel of backs for all three drawer sizes. I still need to trim the bottoms to back width, but that is minor.
Tomorrow I will set up the dovetailing tool and start that part of the build.
16 Dec update - -
I tried both of my dovetailing jigs and decided to use the Willis jig. It is a little more fussy to set up, but does a smaller dovetail.

Also shown on the left Is the Blackham class jig. Here I am doing a side and one side of a front at one time.

The resulting corner.

After the first I loaded the front and the other side in and ran it through.
I trimmed the drawer bottoms to match the drawer backs and everything came togetherr nicely.


In the gluing jig.

Dovetailing one side of the double drawer.


There is a discrepancy between the drawer front height and the side height which will have to be dealt with in another drawer.
17 Dec update - -
That darned Willis jig is so tweaky to set up, but turns out nice looking joints. I am glad I cut a plethora of pieces as I wasted a bunch of them. However, the drawers are together, with the last one still in clamps gluing.
Here they are with the infernal device I used to do em..

22 Dec update
Unable to do a mockup shot without having the pedestal drawer carcass assembled, so time was spent on drawer supports. The original plans have only a front piece and two slides with an open back. I decided on a more rigid structure and went with a four sided lap joointed frame with oak in front.
Here several are completed, and parts for others are in the drawers.

Drawer support frames completed.

I am attaching the frames to one side using wax paper to give a 0.001" clearance between drawer top and bottom and support frames. Once all frames are attached and drawer stops installed I will attach the other panel side. I measured for about the same clearance between the panel sides and the drawers and it should gve a smooth drawer operation. I will put the other pedestal together then attach them to the back panel.


Support frames glued, drawer stop installed and support for bottom plate installed.

23 Dec update - -
Progress was made. The original plan not only had no 4 sided support frames, but no vertical panel joining the two sides. I had room so I added inner pedestal back panel which will not be visible once joined to the back panel. It made the assembly much more rigid once out of clamps. The temporary base foot was removed after the glue set.


One side together, now to the other side.

Beginning to look rather deskish.

27 Dec update - -
Second pedestal assembled. All in all I am not truly happy with the fit of the drawers, and they may get replaced. I recall from the library table build that drawers are easier to fit to existing openings than fitting openings to preassembled drawers. Another lesson learned, but it will give me more time to learn the Willis jig.

Definately looking deskish now.


Needs handles, and a pair of pull out shelves to go in the space just below the desktop above the drawers, and before the top is attached it gets a through dado towards the back to accept the tambour when fully open.
29 Dec update - -
Baseboards attached to the pedestals and inner back panel. Not attaching back panel to pedestal just yet while I contemplate a mechanism to have the drawers lock when the tambour is closed.


7 Jan '16 update - -
I worked out a drawer lock mechanism as in the following rough sketch.

In order to have enough weight to free fall into the lock holes I decided on 1/4" brass strip for the lock, and built a couple of channel boxes that are slightly larger than the strip so there is no binding.
The strip was marked for holes and photographed upside down from where it should be, the dots indicating where the holes should be just above the drawer bottom. It does work out in the end.


Drawer bottoms behind the back were reinforced with 1/64" ply then marked for and drilled. The channels will be offset to the outside of the pedestals to allow room for the pivot mechanism which will go through the intermediate back.


The brass strips were marked, drilled, and brass tubing bent and "soldered" with my old standby super glue then trimmed and sanded flush on the backs.

They engage the holes and lock all the drawers and disengage all as well.


All the test fitting having been successful I am gluing the channels into their final position in the pedestals.

Next will be figuring out the lifting lever. I figure that the tambour will come down about 1/4" below the top of the desk. (There will be a slot to accept this in the top).
9 Jan '16 update - -
Brass wire mushroomed on one end then fit through a hole drilled at the top of the left side lock bar, bent 90 degrees then 90 degrees and through a brass bushing which is glued to a support board and then bent 90 degrees to form the lever. Final shaping of the tambour end is not completed yet as I need to see how wide the slot in the desk top ends up.

The lever lifts the lock smoothly with less force than the tambour is going to impart when open, and gravity smoothly returns the lock to its locked position.


That is the left 4 drawer pedestal nearing completion, the right to follow
12 Jan '16 update - -
Both side drawer locks fabricated and installed.

They operate very smoothly. The rod end shape will be bent when I am ready to attach the tambour top, which other than drawer pulls is the next phase.
13 Jan update - -
Rather than the bearclaw looking drawer pulls on the loaner and in the plans, I am going to fabricate similar to those on the desk I grew up with.
First a strip is coved.

After it is cut to length and the ends tapered and the finger recess is routed out the ends are also coved. Here are some shots of the original and mine.


A drawer full of pulls.

More or less how it will look once they are glued on.


15 Jan update - -
Handles attached, top slotted for tambour and drawer lock actuators. When a flat object is set on the top, the locks do indeed release with minimal resistance. The tambour friction will suffice nicely.

The pull out shelves are together with breadboard edges. On the loaner they fall out but this one will have stops that will interact with the front of the top drawer support and prevent this.


16 Jan update - -
Afterr over sanding two sets of shelves too narrow, I went for one more set and got it right finally.
The ends were sligntly rounded and fingernail groove routed on underside to enable pulling them out, and a stop glued on the underside to keep them from pulling all the way out. Any gaps in the joint will be filled with oak dust which I seem to have an abundance of.


Next is to fill and final sand the pull outs then finish them with linseed oil. Once that is done I can fully assemble the pedestal section and turn my attention to the upper assembly with it's tambour and pigeon holes.
19 Jan update - -
Spent time working on a way to ensure the tambour contacting the locking mechanism wires and came up with the following. I made a hollow beam that will fit loosely in the top slot and narrow enough to fit between the pedestals.

The wires were shaped to have a broad flat area to support the beam, and beads glued to the wires to keep the beam centered during motion.


The bottom of the beam is below the desk top and depressing the beam to the level of the top of the top is sufficient to unlock the pedestals.

It only needs the weight of two and a half legos to give it a full depression, so the tambour will have no problem providing the force required in opening the locks.

The angle block is just for weight to hold the top steady while I opened drawers.

Time for assembly draws near, this being the final work needing to be done beneath the top.
24 Jan update - -
Top section case started.
Side pieces marked on thinned oak panels.

Back is assembled, and straight frame parts cut.

Serpentine front piece blanks double sticky tape joined, bandsawed to rough shape then finish shaped with a Dremel sanding drum.

I had to cobble together a horizontal pin router to do the panel routing slot in the serpentine pieces, and was pleasently surprised at how well it worked.


One side gluing up, with the serpentine parts still joined. I will rout the tambour channels before I separate them as it is easier to manuver the thicker work when I run it over the vertical pin router I put together for this task.

30 Jan update - -
Cobbled up a vertical overhead pin router table for the Dremel to rout the tambour tracks in the serpentine pieces, having done the vertical rear panel dados and tambour tracks on the router table.
Several shots of the process follow. The 90 degree rear slots will be done with a pivot pin underneath after the halves are apart.


The top needs to be a little bit deeper and will make a new one, but this is what it is looking like now with carcase dry fit.

The locking bar will float horizontal with the tambour contact.

Work is mostly on hold for a couple weeks while this cut heals. Darn #11 blades are SHARP!!!

3 Feb update - -
Healed enough to go back to work...
Made the cubbyhole case, the angled upper back to clear the tambour as it goes behind.

nice snug fit in the top carcase.

Cubbyhole framework begun.

Horizontal members first after the basic boxes done.

Once the horizontals in, the vertical dividers go in.


A couple of small drawers in the center and a pair of "hidden" drawers to go.

Check for fit in the top carcase.

Tambour back clearance to lock bar.

Dry assembly of current progress. I am really happy with it so far!!!


Damn.... In my rush to get the cubbyholes togetherr I overlooked the front edge shaping of the four taller narrow cubbies... should be similar to but smaller than the two horizontal shelves on either side. I may revisit this or leave it well enough alone.
8 Feb update - -
Tambour time!
The plans call for creating a custom router bit to do the slat shaping, and several attempts were made with less than stellar results. I looked online and decided on a basic shape that will look good and work well.
Ripped and thickness sanded some oak strips, Sanded rounded edges on both edges of one side of each strip, then set up the router table and routed a small rabbet on each of the other side. A change of bits and turning the piece over routed a center channel.


Thickness sanded the strips again to lower the profile a bit, then ripped them down the center on the bandsaw leaving long strips with rabbets on opposite sides.
Some hand sanding to soften all the edges resulted in neatly overlapping slats.


Now to figure out what glue and fabric to use on the back... and whether to apply finish before gluing.
11 Feb update - -
Decided on a hide glue formulation since this is what full size tambour assembly and repair instructions swear by. I found Old Brown Glue brand, a premix that has to be heated to 100 degrees or over in a hot water bath.
I taped the outside of the tambour, cut some thin check print linen that will not be seen when the desk top is assembled but has lines I can use for alignment. Heated up some glue, applied to the back side of the tambour with a brush, placed the cloth and brushed a layer on top of the cloth being sure it was saturated.


Once the blue tape was removed I tested the top for flexibility and it seems like it will work fine.

Now to wait for full dry - 24 hours or so.. then measure, trim and rout the ends to fit the channel.
19 Feb update - -
Tambour is now trimmed and the ends rabbeted for the grooves.

I needed three tambour guide blocks to assist with the smooth operation of the back travel so I drilled a hole in stock the same radius as the rear slot curve, and glued them in place on the back.


I cut a couple of pieces of flat stock the same thickness as the side panel to the side panel rail surfaces and glued them on where the cubby box was subsequently glued. This will give stability to the top section when glued to the back and the section top. In the last pic you can see the relationship of the guides to the slot.


Dry fit shows tambour fully open unlocking drawers, closing which locks them and a number of other views.


The front end bar does not meet the desk top at 90 degrees so will have to be planed to match, and the handles and tambour lock still need to be both attached and figured out.
This has been so much fun I may make another in walnut or mahogany. I really want to try out a different drawer lock mechanism that uses pivoted arms with tapered ends and a notch that you can close a drawer while the top is closed and have it close and lock. The lock arms are attached to a bar much like these, and can only pivot upward from 90 degrees. The tambour still applies the pressure to raise the arm assembly. I almost tore the back off of this and redid the locks, but I figure I can apply all the various lessons learned here to the next.
April 14 update - -
I let myself get distracted by another roll top desk, and a sudden urge to clean up and rearrange the shop. I let myself get distracted from cleaning the shop by a need for a chair for the little roll top desk. Best intentions aside, I decided the shop was workable as is and to complete this desk.
Starting off I cut out and put the two pencil trays and the two "hidden" drawers into the cubbyhole section.


There are four small drawers in the cubby section, the frames for three of which show here.

17 Apr update -
Made the two document holder bars for the sides of the upper.

After installation of side bars. Still debating on whether to try the letter slots on the upper sides. Some have them, some don't.


At this point I need to do the 4 hidden corner index pins that lock the top to the desktop, glue the major assemblies into one, them oil and wax.
Completion nears!!!!
21 Apr update.
Drilled for corner indexing pins which add stability mostly to the front corners of the roll top section, turned rosewood pins, did final end sanding to the tambour, waxed the track and tambour ends with parifin and glued the upper sub assembly together. After it was dry I glued the desk top to the pedestal base.
Sanding from 320 to 2000 and it is ready for oil and wax.


Boiled linseed oil brushed on.


A couple days drying, then it gets wiped down and a coat of paste wax applied and buffed and I can call this complete!!!!
Gah..... Now what to build???
26 April, 2016 update - -
The desk is completed!
Here are some photos of mine on the left and the loaner on the right, both built from Jim Dorsett's Scale Cabinetmaker plans, some 30 years between the builds.


I am working on an appropriate oak chair to go with it now... pix to follow.
Stay tuned....