Having never built one before I have learned a few things along the way that I could have found out on the web but what fun would that have been?
I started out with some thick foamboard and some 1/4 inch foamboard. After cutting the floor out of the thick stuff, I measured 3 walls worth of the thinner board, and scored most of the way through at the room corners so that it folded into a room with crisp unbroken corners.
I trimmed the wooden floor I made earlier to fit and did some staging.

This may be the final stage unless I put another chair together in the next couple days which would give this look.

After playing around with various settings, I took it all apart to paint. I decided on Navaho White semigloss latex I had from some paint job long ago.

While it was drying I cut and molded some walnut baseboard. The results are below.


Fairly room like.
So... off to glue and tape... and lessons learned.


Lesson learned is that if you paint one side of foam core, it will warp as the paint drys pulling unsupported ends in. The only thing I could do the next morning was to paint the outsides and use
spreader clamps and bar clamps to push and pull it square again. It actually worked!

More as the final end is in sight...
July 5th update:
I looked at the baseboard molding and decided it needed an extra touch, so I sanded some 1/4 round thumbnail moldings from round coffee stirrer or cotton swab sticks, and stained them with a couple coats of dark walnut and a coat of mahogany to kill the red tint that had appeared.


It adds some 3D reflectivity as well as hiding the slight voids around the edges (Just as real thumbnail baseboard molding does!)
Next I need some electrical outlets and light switch. Not having a hobby shop near where I am currently I decided to make some. The first idea I put here to show one that failed.
Needing plastic, preferably white, I turned to a Tic Tac box.

I chose this as it had 3 edges already tapered and only needed the flashing trimmed off and the three possible in one lid cut out.
I deformed some aluminum tubing and made an embosser that when heated over a candle gave it a coating of soot to fill the slightly melted in design... I was disappointed with the result.

So I went on the web, copied a picture of an outlet plate, shrank it to various scales and printed it on glossy photo paper.

After cleaning off the soot that was on the embossing tool I had made I filed the edges a little sharper, and pressing over a piece of wood was able to emboss the lines in the picture. A jeweler's screwdriver embossed the plug holes. After cutting one out I glued it to two layers of card stock.

After the glue dried I trimmed it off using a #21 blade tapering the edges where the photo showed them. I want my own shadows.


Need to tighten up the trimming a bit, but it produced a fairly convincing outlet!
Now to make 4 or 5 more, and use the same technique to do a wall switch, using a bit of plastic as the switch handle.
Stay tuned.
July 10 update -
In retrospect three layers for the outlet plate turned out about 1/3 too thick, so 5 more were made using 2 layers. Very convincing.

I then undertook the light switch plate, starting with a single switch and ending up with a double switch. The plastic for the switch lever did not adhere well, so I layered 4 layers of card stock and trimmed some thin pieces for handles and gel super glued them in place. Prior to this I had turned a bit of 1/32" tubing into a screw head embosser and used it.


Note that the top left screw lost the photo head during the embossing, so it became the tiny missing screw detail so common in real life.

After trimming the back flush.
I may try to emboss the screw head slots, but that may be a step unneeded.
I am eager to get these plates in place in the room!
More as it progresses!
July 12 update ...
I see that the electrical contractor finally showed up to power the room.


Great... an outlet I have to crawl under a table to access....

Hmm... wonder what this other switch does? I bet it switches the outlets below.
Now I wonder when they are going to deliver the PA and recording console?
July 15 update.
The wall art is in. Starting on the left wall with a delightful painting of Jerry G. with ModPodge brush strokes for realism and shine.

Same treatment for the guitar painting on the rear wall. Both were mounted on the black side of mat board, edges folded over and glued to the edge. When dry trimmed flush to the back and some flat black brushed on the edges.

The right wall has some posters and a road sign which I mounted on aluminum sheet and trimmed flush. You can see the metalic reflection from some angles.

I know you are tired of seeing the whole thing picture, but here are a couple more. =)


Final placement of interior is still in flux. I have a couple more chairs being constructed, and the guitar cases really want to lean to the left. I may just swap sides with the stuff.. Mic's still need cables which will be looped around the top of the stands seein's how there is nothing to plug em into.
More as it goes..
g
July 22 final update before submitting for the fair.. it is done!
It is like looking into a mirror, but the guitar cases were much happier against the left wall than the right.
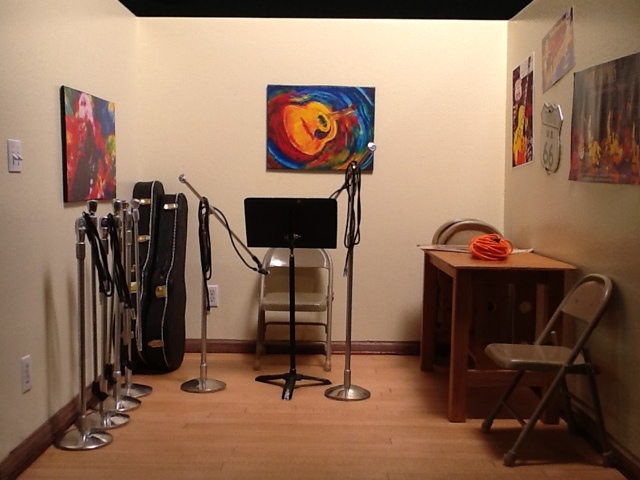
The last pic was taken from this angle as a test of the museum wax used to stick stuff down.

It actually holds pretty good. I even gave it a 12 on the Richter Scale quake when I knocked it off the table and bounced it off the floor. Surprisingly only the table and chairs on that side came loose. The heavy mic stands and rest stayed put.
I then went to framing the box with some channel strip I slotted here where I am. The end result is as follows in the next few shots, which may seem redundant in content, but are final so deal with it... =)


And finally....

Thank you all for your patience and comments during this fairly long (for me) build. During the middle of it I also assembled the NAME 2012 hutch for a club member, and repaired a yarn winder for another club member's spinning wheel.
Til the next fit of mini madness strikes,
Gary


