Wednesday, October 29, 2014
1/12 Scale 1951 Gibson GA75W Amplifier
Among my music things demanding to be minimized is my 1951 Gibson GA75W guitar amplifier shown in the first picture. The guitar and horn are for some far off future project. This picture was taken onstage at the Grump Brothers Band World Tour sometime in the past.
As usual with my prototypes I started the photo documentation late, but will try to keep up and let you know how I got from A to Z.


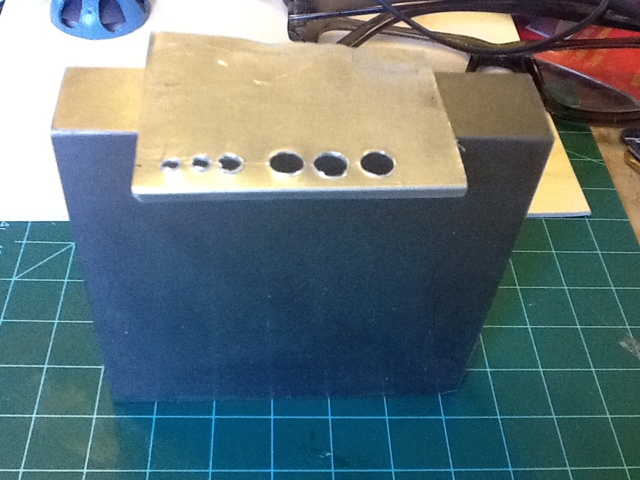
Now that I have the rectifier and power tubes sorted out I needed to think about the chassis to mount em in. I tried a couple pieces of balsa, but no matter what I did in terms of finishing it looked like wood. I finally decided on aluminum as shown below.


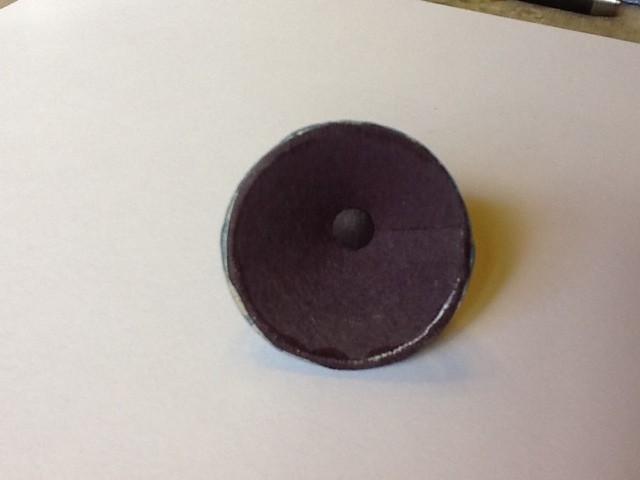
I reconed the speaker since the first attempt had glue all over and did not really fit well. After mounting it in the frame I added one detail which sells it as a speaker, but will be totally hidden once it is mounted, the center domed coil cover. It is also deep enough that the profile picture looks like the cone extends back to the magnet.


June 22 update -


At this point I think it is safe to say that it is complete.
As usual with my prototypes I started the photo documentation late, but will try to keep up and let you know how I got from A to Z.
The first steps involved building a case out of balsa wood which was then covered in thinnish brown paper.
This brought me to the speaker... The original is a Jensen 15 inch field coil monster. I debated on building press molds and squashing one out of aluminum, something I may yet do at some point in the distant future. The rear view is not of mine, but is eerily similar.
I went to Goodwill to see what speaker shaped and sized objects de castoff I could find and settled on a dead radio control monster truck that had deep rims on the back tires.
After removing the tire I had this to deal with.
I felt sure that there was a speaker frame somewhere inside this rather substantial rim, so off to the bandsaw I went.
My usual trim everything away that does not look like whatever I need commenced.
Thankfully the back side was not chromed and was able to be sanded, ground and trimmed into the basis of a speaker frame.
Glue on the paper cone will not be seen due to the grill cloth.
A coat of acrylic "Jensen blue" on the frame after altering the frame hole shape, and gluing on a Sculpy magnet cover followed by a blast of clear lacquer to give it some shine gives this a fairly accurate representation of a speaker. I need to make the field coil still and the chassis with the tube mounts, as well as cobble up the panel, but it is looking better and better with time.
The full size has some cording down the front and wrapping around the top to the back. I glued some brown thread in place prior to painting
Small light bulbs with the base sprayed black will be mounted on the chassis along with some small cans and a transformer.
I realized after this that there are four small tubes alongside the three larger ones. I will make a new chassis panel and post that here when done.
The next thing I tackled was the field core speaker driver transformer thing that hangs off the side of the speaker in the rear view picture earlier. I tried carving it out of wood, and grinding it out of aluminum, neither of which were satisfactory. Back to the bending brake and aluminum sheet which resulted in this frame. It was formed like the full size one, by making a channel piece, filing some 90 degree areas in the sides to bend the sides around, then wrapped some masking tape around a 1/16 balsa core which was inserted into the frame and to me is quite convincing. Adding appropriate wires and mounting it to the frame complete the illusion. I will admit I had to remake the transformer metal surround after I broke off a mounting tab.
The above shows the new chassis panel also.
I reconed the speaker since the first attempt had glue all over and did not really fit well. After mounting it in the frame I added one detail which sells it as a speaker, but will be totally hidden once it is mounted, the center domed coil cover. It is also deep enough that the profile picture looks like the cone extends back to the magnet.
The box and panel were masked and two coats of satin paint were applied with light sanding between coats and are now doing a couple days drying (ocean push just drove humidity up here in the great Pacific NW).
I will take that time to complete the speaker, add wires where needed, and contemplate the panel which will need a red jewel light, toggle switch, fuse holder cap, four chicken head knobs and five input jacks. No problem......... oh yeah... some distinguishing graphics, including a brass logo for the front..... and oh yeah, power cord, feet and leather handle....
stay tuned....
------------- time passes
I started the day out with a hard wax rod that I ground a chicken head recess into and pressed out a bunch of Sculpy knobs...
Unfortunately, I was unable to remove them intact after cooking them, or by slicing them off prior to cooking, Back to the drawing board...
I turned knobs out of rosewood leaving little pegs on the back to mount with. I turned a toggle switch handle from aluminum, a fuse cap from black plastic and photo'd shrunk and printed a panel.
I painted the preamp tubes black, and mounted all the tubes to the chassis.
Dry fitting it all together is quite convincing. I still need to do the handle and it's mounts and glue one end of the power cord onto the back side of the chassis and make a plug for it. Four feet should complete the build. Not sure if I am going to try the logo or not.
More as it is completed.
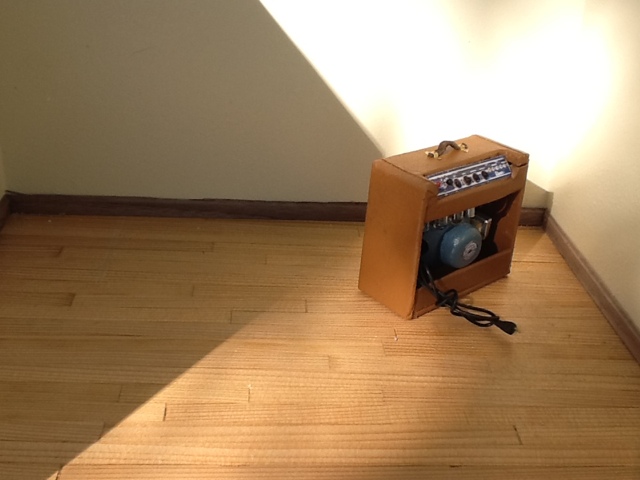
June 22 update -
It is dry fitted and basically complete at this point, requiring final adhesive permanence and minor touch ups and/or aging. It is after all a 60 year old amplifier and they all look rather road worn. The logo may or may not appear at some future date and will be photoed at that time.
I have to mount the feet, but most that are out there are and have been footless for many years so that may pass.
Enjoy the fruits..
For this post I think this is complete. If there are any drastic changes in the future I will addendum them. Thanks for watching. It has been fun, see you next project!
July 12 update...
The Logo was still missing, and although many out there have it gone or partially gone, it really needs it... so... In order to do it in brass shim stock I shrank and printed a pic of the logo onto brass and tried to cut it out under serious magnification. Epic fail.. if I ever want to use brass I will have to learn how to do photo etching.
I shrank the pic, matched the brown and printed it on paper instead. Close trimming and some Mod Podge gave me a reasonable appearing logo.
Embossed some screws and voila...
At this point I think it is safe to say that it is complete.
Friday, October 10, 2014
Club 1/12 Scale Store Roombox Project
This will be a fairly long and comprehensive post and as such I am not going to fill your inboxes with continual update notices.


Having been gone for most of the summer I was deluged with a large number of store contents kits, the roombox kit, and some interior furniture kits.
I assembled a counter and a bench and will post pix of that later on once I decide to take them out of the white and age them. To begin with for me though is the box itself, the floor in particular. I thought about what I had available and decided on a strip wood walnut floor similar to the test floor I did for the Mission Style Den project.
The back edge of the floor had to be taped off since it will be a glue contact surface for the back wall, and I used a piece of aluminum channel with a spacer behind to further protect that area as well as give me a solid straight ledge to butt the first row of floor boards against.
Then began the laying of the boards, 3 rows at a time, and weighted til set.
Randomish lengths of walnut waiting for their places.
Gaps will be filled with inserts. Finer gaps between boards will be filled after initial sanding with a mixture of fine walnut dust and boiled linseed oil as a pore filler.
Here the laying of the floor has been done, major gaps filled, ends trimmed and sanded and initial 220 grit sanding is done leaving a small amount of dust
To this dust I added an ounce or so of boiled linseed oil and started rubbing it in.
After it was in I added another batch of walnut sanding dust and rubbed til it formed a thick slurry which I squeegeed in with a credit card.
After letting that sit for a half hour or so I rubbed it off with burlap and put it under the lights to dry.
When this is dry I will continue sanding through the various finer grits with another coat of oil when sanding with 400 grit wet and dry paper to fill any pores yet unfilled. Once dry I will continue up through the grits to 2000 or so. A couple coats of carnuba wax for that shine will follow and once the floor plan is complete, worn areas will be worked in.
Sanding is completed, a coat of carnuba wax with more sanding dust worked in and once dry rubbed off and buffed. One more coat of wax at some point in the future. Pretty shiny right now!
I stained the whitewood counter and bench with a dark walnut stain and am making some front corner posts that flare out as a shelf support for the front of the counter. They will have a scrolled top piece.
These will both be sanded out and waxed and buffed once decoration is complete.
stay tuned
Subscribe to:
Posts (Atom)