Followers

Tuesday, February 11, 2014

1/12 Scale Mission Library Table


I seem to have been drawn in by the wood from the sacrificial oak drawer sides.  I have begun cutting out the parts for a Mission style library table using plans from Fine Woodworking Magazine.  I have built one in the past that has become a part of the Music Practice Room box, and want another.

Here is a picture of the one I am going to attempt.  It has 3 drawers which wil give me some practice doing those.


More as the project progresses.

Also in queue in the mind are a Mission Morris Chair, some A&C table lamps, and some end, coffee, and sofa tables.

Who knows?  This may be the beginning of whatever large project is actually going to occur.


Stay tuned...

gg


19 Feb 2014 update - 


The sacrificial oak drawer side has been turned into thicknessed board stock.


After a number of hours with the digital micrometer, thickness sander, table saw, and miter rite I have the pieces for the table and the frame supports  for the drawers.

Next step is mortise and tenons where needed.


It has some hidden mitered tenons, and some through tenons both
 of which should be interesting.


Stay tuned..

20 Feb update-

Started on tenons.


Was pleasantly surprised that once the tenons were cut that the shoulder to shoulder measurement was just what the reduced plans called for.


Most of the tenons are cut.  There are still a few more,  back top rail, and drawer separators and guides.  

Next are mortises, which will be interesting to figure out.  As I recall, drill bits this small tend to follow hard grain and wander off...  maybe I will just have to grind out some thin mortise chisels - will need them anyway later on.

stay tuned 


Feb 21 update - 

Today I explored various methods of doing mortises.  I ended up filing out a small mortise chisel .  After marking the length of the slat mortises on one of the top side rails I used a scratch marker to designate the width lines.  It will improve with further practice I hope.  I also tried a Dremel saw blade which seems to do ok, but is just barely too wide a kerf for the slat mortises.  I think I will look into bits used in guitar inlay.


Repurposed broken dental something for a mortise chisel.  I narrowed the angle even more after this photo was taken.


Not the straightest mortise cut I have done but it will improve with practice.


The uneven mortise edges are well hidden by the shoulders of the slat.

More to follow...

23 Feb 2014 update - 

After a couple more raggedy mortises I decided to go to the Dremel drill press with the elevating table and a #61 bit.  By marking the width then scoring the center of the intended mortise I had a spot for the drill bit to begin.  I set the depth stop at just past tenon depth (for glue clearance) and clamped the piece in the vise which I moved along a bar held with double sticky tape parallel to the mortise marking.  I have since replaced the taped bar which tended to slip with a guide bolted to the table with wingnuts.   Running it at next to lowest speed I was able to drill a series of fairly straight holes.  The first couple I then cleaned up with the chisel and a blade.


The next couple I drilled the holes then slowly raised the table a little bit at a time and used the spinning bit like a router bit and cleared the slots cleanly.  

24 Feb 2014 update - 


This made the mortises much easier to do cleanly.  

After doing all the leg mortises and the through mortises in the bottom side rails I dry fit it together to see what I had, how it fit and what adjustments might need to be made.


The top boards are not joined as yet but just set on for appearance.  One thing I have to do is check the shoulder to shoulder distances on the lower shelf and the rear upper rail. They are apparently not exactly the same (minus the exposed leg to bottom rail distances) and the legs splay out a bit at the bottom.  Once the legs are square I can take the measurements for the drawer support frames from the rail shoulders.  The original plans have the frames joined to the table with biscuits...  not something I want to try here, so it may just be glued in place.  

There are spacers that go on each inside top rail to make up for the distance from the leg edge to the shoulder width.  A pair of them go in the mortises on the back rail as well.  I am not sure why the plans have them on the rear of the top rear rail and may reverse it before I go to glue.  It seems that it is a detail that if visible on the back, should also be on the side rails.


I am quite pleased with the progress thus far.  The through tenons look good, and will look better with mitered edges.  Slat interval distances will be corrected in final side assembly.  

stay tuned for more.


27 Feb - 

I tackled the top today.  Glued it up as shown below.


I have decided to add breadboard ends because I like the more complete look with them.  I cobbled up a slitting saw and after much finicky adjusting got the ends mortised.  I will set the router back up tomorrow and make the long tenons on the table ends.


It will look good when fitted and finished.

I am going to have to deal with the drawer support frames soon,,,   As I am not going to attempt biscuit  slots I am thinking of tiny splines, but may just butt join with glue.  It is not like the drawers are going to be full of heavy junk.

gg

Feb 28 -

Table tongues routed to fit the grooves in the end pieces.


The fit is OK, and will look good when glued and sanded to my usual 3000 grit after boiled linseed oil finish.

gg

4 March 2014 update - 

After a busy weekend at the Seattle Miniature Show I returned to this table project.  The top breadboard ends were glued, the table side pieces glued, the drawer support frames completed along with the dividers.  The rear rail was installed to the top drawer frame with its spacers.  For strength while I handle the assemblies I used super glue, which led to obvious glue areas.  Hopefully these will not be visible once it all comes together.


I then routed the drawer guide pieces which straddle the above spacers and on the ends.  They have a 0.030" slot for a drawer guide to be inset,  per plan .030" X.060".   The guide strips are proving to be a challenge to cut...


Once I get the guide support strips inset I will do a final carcase glue up and assembly.   OH..  I still have to half lap some center drawer slides in the center of each of the lower frame openings.

The next step is dealing with drawers.  I have to build a finger joint jig for some tiny finger joint joinery.

stay tuned...

5 March -

Dry fit of components -


Gluing drawer frame slide mounts -


Gluing drawer slide inserts


Drawer frame assembly glue up.


Dry fit of table assembled -


Drawer guides for bottom of drawers, half lapped so raised above and flush with bottom of frame.


Final glue up is underway as I write.  Tomorrow should see the desk assembled.  I did get good news via email today -  the scale dovetailer I ordered is in the mail and just in time to attempt dovetails on the drawers which are next up on the build.

stay tuned -

12 Mar update - 

The dovetailer works great!  (See the dovetailer entry).  The three drawers are together, needing fronts and final fitting followed by hardware.  The process was as follows.


Drawer height strips of oak center slotted on one side, and edge slotted for the bottoms.


A side and an end are placed into the jig face out, end on top and butted up against the side.


Running the jig against the spinning bit produces tails on the side, and pockets on the end piece that do not extend all the way through, hence the term "half blind".


I am using a 1/16" thick piece of spruce for the drawer bottoms which are rabbeted and fit in the slot on the inside of the drawer pieces.


Nice and square...


The drawers are together, and the one on the right already has the guide slots started.  I still need to set up an overhead Dremel router to do the center bottom slot and some final fitting and clearance sanding before I do the drawer fronts, but it is coming along.

13 Mar update - 

Drawer fitting done, nice and smooth with enough friction they don't just fall out.  I am going to paraffin the glides for further smoothness.

This leaves the drawer fronts which will hide all the drawer guides and the hardware which still has to be fabricated.


Drawer fronts gluing with paper spacers.


And now to the hardware pulls which are described as hand hammered.  I torched up some coat hanger wire and pounded it on a vise anvil til required width was reached which produced a nice thickness, as well as texture and coloration.

Now to see if it will cut and drill.  I am going to glue the scaled photo print of the plates to the wire before drilling.


First attempt at the rings for the pulls are out of government copper.  I would like to do a solid pull ring and fold the bail over it into the plate.  This solves the problem of making the post and pierced bail as well as the weakness of the ring where it passes through the bail.  A split ring stands a chance of opening up if used to pull the drawer.

OK...  so the penny rings turned out to be too difficult to get three identical rings...  and to save bandwidth I am deleting those pictures and putting up what I went with.

What I did was cut some slices of brass tubing and filed off the rough edges, bent them into partial ovals, filed some 1/3 round notches on one side to fit the bail.

I took some small iron wire, filed a flat on one side and used that on the outside of an eyelet bend in the end of the wire.  After inserting the ring I completed the compression of the loop.

Drilled bail mounting holes in the steel flat coat hanger wire, and then trimmed the three individual plates.


I measured and drilled mounting holes in the drawer fronts and placed the pulls temporarily in place as below.


 I am altogether pleased with the future end result!  Final top mounting and finishing seem to be the next rational step.

18 March -

Tis all glued together, drawer glides and sides are paraffined and slide like butter.   


Only thing left to do is a coat of finish oil.  


The oil makes the dovetails stand out nicely!


A couple hours soaking in time then rub the excess off, a couple of days drying time and rub it out to a 
nice satiny shine.   Final photos will follow.


I just noticed that I forgot the little arts and crafts winglet brace things on the original.  Not sure I want to add them.  I like where it is now..


What next.....   what next...   I have plans for a Morris Chair from the A&C period...

keep tuned.  

Gary


Results from the State Fair for this little table below...


Now to include it into the larger "den" roombox for next year!

gg


Sunday, October 20, 2013

Soft Case Gig Bag for the Clawhammer Banjo (full size)

Years ago I made a guitar case cover to protect a guitar from heat and sunlight during a long summer road trip through Wyoming, Colorado, Kansas, Oklahoma, and Texas where the guitar was going to be riding in the back seat.   A musician friend introduced me to a product called "Reflectix" which she uses inside her van windows and roof for insulation and cooling when camping.   It is basically some bubble wrap with mylar surfaces to reflect heat and light.  It comes in various sized rolls at your local hardware center and is quite inexpensive.   I put the newly covered case out in the direct sun and left it for hours.  It did not even warm up inside.

Not that I need much in the way of sun protection with the banjo, it will benefit from some cushioning and insulation,  as well as the banjo gig bag/case being quite light.


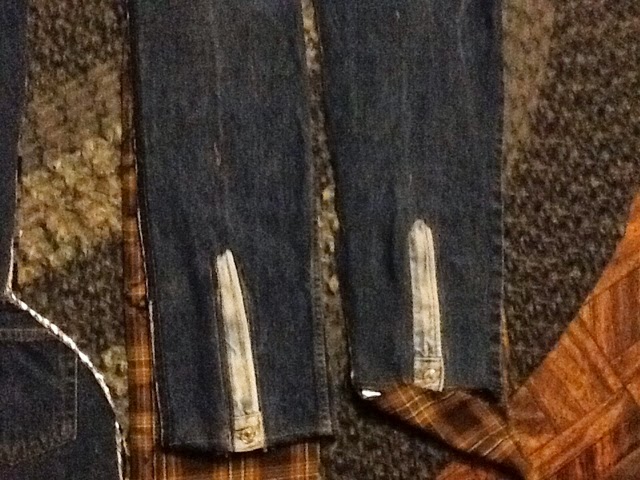
The plan initially is to cut out 4 oversized banjo shaped pieces, two to be used per side with some cardboard reinforcement inbetween, all spray glued together.  Side strips will be cut out and both the side strips and the front and back pieces will have denim from some sacificial jeans from St. VDP glued to them on the outside surface, and some flannel from old shirts glued to the inside. 

After the glue is dry I will sew all the edges together using my White's Family Rotary treadle machine, covering the raw edges with cloth adhesive tape which will then get another row of stitching.  A zipper will be centered along the bottom end for a bottom loading case.  Straps and handle will be attached at the end.

For now, here are some pix showing where I got to tonight.


More during tomorrow's session.

21 Oct update

Took the table and stuff outside and sprayed and glued.  The front and back pieces are laminated from two pieces of Reflectix with a banjo head sized piece of cardboard between them.  The denim front and back were then glued on.


I inserted some zipper flys in the ends of the side piece denim to form the end load zipper opening.


Then back to the thrift store for some sacrificial flannel shirts for the inner linings.  Below they have been glued to the other side of the pieces.


Tomorrow I will decide how I am going to assemble it.  So far I have broken 3 leather needles in my treadle machine attempting to sew too thick a spot....

I trimmed the inner reflectix on the top and bottom to 1/2 inch larger than the banjo to make the suturable parts thinner.  Still not going to be able to machine sew it.

------------------------------------

Oct 24 - Stapled a side into place and hand stitched with fairly large stitches, and pleased with the overall look.


Outer edges will get trimmed and covered with "athletic adhesive tape" then sewed again either with a running stitch or a spiral whip stitch...

OR....   perhaps there is a cobbler/shoe repairman locally that would be willing to run the taped edge through his sewing machine he uses for sole edges.  I will look into that.

Both sides are on, top is ready to attach..


As soon as my finger stops bleeding...  apparently tried to snip a chunk off the tip...


Not the best thing I could have done a week away from a music camp...

Oct 27 update...

Finger healing well, should be good to go for the camp next weekend.

As the cobbler/shoe repairman wanted $50.00 to sew the edges, (twice what I have in for materials), and that my treadle machine would not feed this thick a "fabric" sandwich I resorted to manual assembly, a task which proved fairly strenuous...

Gig bag top attached with big basting stitches to put shape to it and test fit the banjo.  The edges will be trimmed to about 1/2 inch from stitch line then covered with white tape and sewed again.

I am pleased with the rigidity of the case once all the edges are joined.  


I still need to make a foam/denim/flannel flap for the opening, construct a handle and shoulder straps for backpack carry.

Coming along nicely...

Oct 31 update - - - - - - - - - - -

The flap has a piece of spring steel in the bottom edge to keep it in place behind the zippers when closed.


Instead of white cloth tape for the edges I opted to use black gaffer tape and I think it worked out well. I whip stitched around all edges with denim orange thread, breaking no less that 6 needles in the process.  Each stitch was made by pushing the needle through with a pair of spring open pliers.  Going through tape both gunks up the needle, and dulls it to the point of it breaking once in a while.


Once stitched, back to SVDP for some handle strapping, which matched the case surprisingly well.
I also got a backpack for sacrificial straps for the future.

As for now though, I deem this project not only complete, but functional and fitting with the theme of the instrument safely cushioned within.


Til next time...   stay tuned


Wednesday, October 9, 2013

1/12 Scale Clawhammer Banjo (This project is on indefinite hold)


Last month I went to Uke Fest at Ft. Warden in Port Townsend, WA.  During a visit to the local musical instrument emporium I was drawn to a tack head clawhammer banjo for sale.  It turned out to be a Civil War era recreation fretless banjo with a huge 13 Inch diameter calf skin head, oak rim and maple neck.  It is one by banjo builder Eric Prust who specializes in this particular era of banjo.

As it has pseudo gut strings, a through dowel rod that the tailpiece ties onto and friction tuning pegs it might be a candidate for fairly easy shrinkage.

Here is the original on the day I brought it back to Ft. Worden.


The build commences with a thin strip of oak on which I sanded tapers on the end faces, steamed and then bent around a 1inch steel punch handle.  When cooled I slathered Elmer's glue all over it and rewrapped it, clamping it in place with a dozen miniature plastic clothespins. 

When this was dry I was able to mount it to a mandrel on my drill press and sand the outside smooth, and then sanded the inside with paper on the mandrel.  A quick touch of the edges to the belt sander to even up the wrappings produced a plausable and rigid banjo rim.  Final measurements will be approached later.


It is out of scale in thickness, but the unbent strip in the picture above should make one closer to scale.  I will take pix of all the steps with the next rim.   Banjo rims vary in thickness in the real world so it would not be totally out of place if i used the first one.

10 Oct  update - 

I cut a square strip of maple scale 2.5 inches sq, laid out and sawed, filed, whittled, and sanded a neck.  I also cut a scale 3/4 inch sq dowel rod, and rounded off the part that will inserts into the hole in the neck heel.  I still have to drill and file a hole in the dowel stick for the wedge holding the neck to the rim.


That will complete the major big work leaving things like final fittings, ebony pegs to be turned, carved and drilled, and some star branding irons to be made to brand the markings onto the outside of the rim and the peg head and scoop.  I also need to cut out a bridge and tailpiece.

Material for the top is still being debated.  I am not sure what skin would be thin enough to mount and shrink...   mouse maybe?  Think I will call some local taxidermists to see what they would recommend/have available.  I will also have to index drill some 40 tack mounting holes 0.083 inches apart and glue in teensy round head tacks.

It sounds worse than it is, but putting my process into writing helps me concentrate on the project, and you get to see how my mini mind works.

Oct 12 update -

I went back and remeasured and recalculated the shrinkage for the hoop as the first one looks considerably too thick and slightly small.   

I sawed a new oak strip just under 0.02 in thick and steamed and bent it around the same mandrel with enough wraps of blue tape to equal 12 1/2 inches which is the ID of the full size banjo.


Tape around a forstner bit with double sticky tape for outer sanding on the drill press.

A piece of plastic vacuum hose fitting serves as a mount to file the holes square without puncturing fingers on the non file hand...   (lessons learned the hard way are the best retained)


Much closer to true scale now.  The first pot will probably find it's way into a tenor or a bluegrass banjo at some point in the future.


I suppose that I should have used an ink stamp or stencil to do the stars.  The original has them branded in.  I made a little branding iron and went for it.  a couple came out nicely...


And a couple were slightly overdone.  Temperature control at that size gives a very narrow window for getting a clean stamping/branding.


As this is more or less a proof of concept model I will learn my lessons here, and do better on the next one.

Still debating what to use for the head...  it has to be slightly translucent, thin, and apparently taut enough when mounted.   Real hide would be nice, but I fear impractical.

Any ideas out there among the readers?

Off to the watchmaker's lathe to turn some ebony pegs...

20 Oct update -   Did not get to the pegs as expected, however one of my followers here and on CAMP passed a great idea for the head material.  She suggested I use real leather parchment and sent a link to a firm that provides various thicknesses (from apx 0.01" up) of calf, goat, deer etc.  They sell a 1 lb box of mixed scraps with apx 4 sq in ea, and 3 dozen pieces per pound for $25 plus shipping.

While I eagerly await it's arrival I decided to embark on a new project (a gig bag/soft case for the full size banjo)  as follows in the next post.   I will continue this one as it progresses.


6 Nov update...

I received the parchment and while thin, I do not think it is as thin as it needs to be.  I sanded a small piece thinner, soaked it in water and after cutting a hole in the lid of a snaptop container (for air flow for drying) I stretched the skin and snapped it shut.  I think this is going to work.  Photo results follow.


Results were quite promising.  I will have to make a form the same size as the rim with a close fitting outer ring to do the stretching of some even thinner skin.  I am not too concerned about perfect tightness as it will not actually produce audible notes with the strings I have, but this test gave me what I am looking for.

I have been slightly distracted by a new project idea and may be bouncing back and forth a bit.

Stay tuned...