I10 May, 2016

It includes the most detailed drawing of how they are constructed outside of the actual Patent application drawings which leave a lot to be desired.

Even so, there are only basic measurements of component pieces and the miniature will have to be scaled from these.
A rough plan for the case was drawn up and the search for appropriate wood begun. I found some very tight grain walnut in scale 3/4" thickness that would do nicely for rails and posts, and am looking at some rosewood I have for the same thing. We will see where it goes. This should be an interesting project. I hope you enjoy the progress.

15 May update - -
A clearer set of plans drawn up with a cutting list for the cases.

I decided since this is not one of the superior grade desks to go with walnut framing and mahogany panes for the cases.
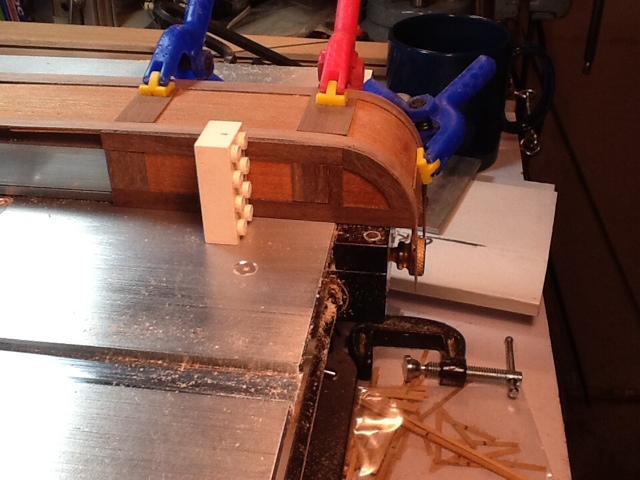
To the new Byrnes table saw and using a slitting blade cut the rough frame stock. With a 0.020" kerf blade in the saw I dadoed all the long frame stock. After cutting the pieces to their respective lengths, I put a 0.040" kerf blade in and set it to cut the tenons.
Once all the framing was cut and prepped I thicknessed some niice tight grain mahogany to 0.038" with the fine side of the drum sander, then tenoned one side of each edge for an offset tenon. The tenoned side will face inward, and the deeper profile of the untenoned side will be visiblle once the inserts are constructed and inserted.
A dry fit of back and one side.

I remember now how I dislike gluing panels and frames.... nevertheless the main case sides and back are glued, not together as yet but glued.

During the assembly I used a bad side on the left side center stile that would not otherwise be shown on the outside which means a repair before finishing can happen.
The offset tenon worked nicely giving a good relief to the outside panels.

I put a 0.012" blade in the Byrnes and using the micrometer to move the fence kerfed the backside of two door frames. These will be soaked and bent to the profile of the upper part. A test piece curved nicely. The kerfs are removed over the dado making a rabbet as the dado shrinks as the curve progresses.


Next are the plain door inner panels which get a routed design, and assembly of the door shells.
17 May update - -
All the shell panels are glued and trued. The inner door panels are cut and profiled, although I am thinking they are actually rosewood instead of walnut, and may need to be redone. The main case top is of the same wood and may have to be redone as well.


I am test bending a piece of mahogany for the upper panel of one of the doors.
Another thing I am discovering as I go are errors in my cutting list, as well as omissions like the panel measurements. All will be corrected before I release the plans for public consumption.
19 May update - -
Test bending the panel blank did bend it, but not sure how to get it in once the frame is bent.
First things fist though. I laminated some walnut veneer then thicknessed it. Out of this I cut new door front frames and the door ends that were rosewood. The new door frames were required as the plans show one door case slightly wider than the other and it showed in the gap when I stood the door panels up against the side panels. I also needed to lengthen them to make the full curve.

Walnut looks better than the rosewood.

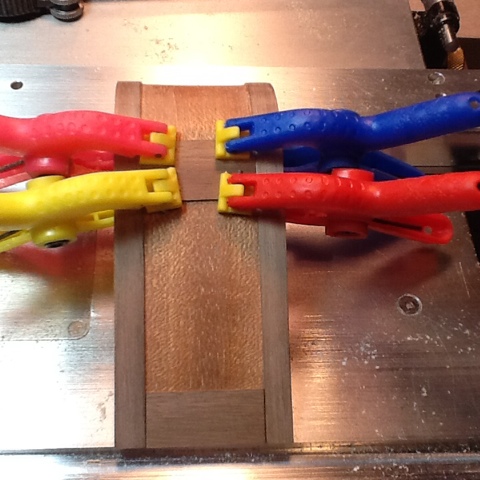
Ithe middle and bottom stiles and panel glued
21 May update...
Lessons learned, proof of concept made. The bending did not go quite as planned. I kerfed the panel by itself, and kerfed the front stiles after the lower panel and rails were glued in. Inserting the panel knocked off some brittle walnut, the rest of which came off during the bend.


After drying and using some superglue to hold the panel in which turned this door front into a learning sample I ended up with this.

Trimmed to length it looks like this. The bend can be tightened up to where it needs to be, and if superglue had not gotten onto the front I might have used it.


I went ahead and thicknessed some more mahogany to about 0.015 or so and it is flexible enough to bend easily dry around the form. I am going to laminate a couple three layers, creating an artificial edge rabbet at the same time around the bending form.
I'll do the same with new walnut so I don't have to do the kerfing for bending and will be able to create the dado for the panel at the same time.
I have plenty of walnut, and the new saw makes quick work of new stiles and rails.
24 May update - -
Rethought once more. I decided to use a backing of 1/64" aircaft plywood with the mahogany glued to it over the bending form. When that was dry I glued the outer walnut strips on once again bending over the form.

When that was dry I fit the cross pieces, and then glued them into place.

While all that was gluing I bent and glued the other door front using tape to hold the layers together to the form.

Stay tuned...
No comments:
Post a Comment