Followers

Monday, June 16, 2014

1/12 Scale Arts and Crafts Floor Lamp

Needing light for the reading area that is slowly emerging I researched various types of A&C and Mission lamps.  Since I have some brownish greyish Russian mica on the way for lamp shade panels I decided to forgo the typical oak lamp in lieu of black and brass.

This began life as a piece of the Topher Gayle stash of ebony he sent.  After squaring and sanding I put a decorative edge on the top side of the base and upper base with a miniature beading bit.


Some cross milling of the underside of the base I got both feet and a recess to do wiring in.


A dot of super glue and kicker after the base top centered, then marked and drilled for poles.


I cut some 3/32" brass tubing to scale 5ft, and tried it for appearance.
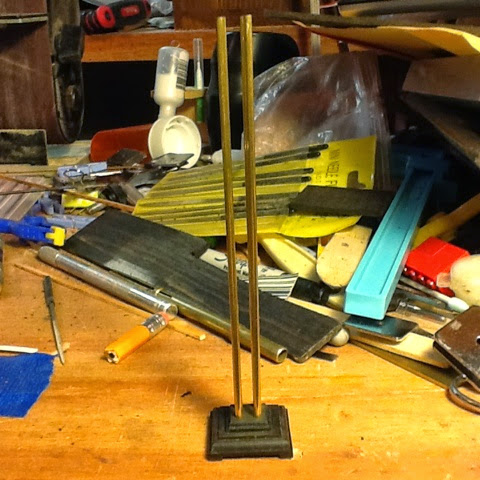

Satisfied that it is taking the path I have in my head I cut and drilled a middle spacer and a top plate.


I have a plan for the shade, and will use brass or ebony as a frame.   Since there will be wires coming up at least one of the tubes I still have to figure out what to do on the top plate.

Update - 

I decided on a "stepped pyramid" top with a cavity that links the 4 tubes to a center top tube.  This cavity will allow wiring to be run however I want.

I beveled the edges of the four tube holes, then cut a piece and cut a cavity with a round nose bit.


After some super glue wicked in from the inside you can see the top of one of the tubes inside.  All four  tube tops are clear and visible.  


Top plate attahed and drilled for top post, which was then placed for photo.  I am thinking that I want to dress up the center plate, maybe with a centered shallow slot around the circumference.


Now I wait for the mica to build the shade.  I tried running the wires through the poles to the top and while a little finicky, they will fit.

The mica I had on order arrived from the Ukraine, and unfortunately it is totally clear.  It will not work for what I needed it to, unless I am able to laminate it with something, so I am again looking around for some brown or orange shellac mica sheets.  In the mean time I will see about a table lamp version of this.

The original dimensions I had for the shade were 12 inch lower sides, but when a template was constructed it looked too small, so I increased the lower sides to a scale 18" and am happy with the over all look.  It is just resting on the top of the top plate in this pic, but when grouped with the chair, hassock and bookcase it looks pretty good.  It iw not really lit, just white paper that reflects well.


I think this may be the final height for the top of the shade, meaning I have to shorten the 4 uprights some.  The new mica arrives tomorrow hopefully!

June 22 update

Mica arrived yesterday and this is what came out of it.


It may end up with a wooden (ebony) frame...  or brass... we will see.  I am leaning toward ebony though.


That is the lower frame done, filled and ready for finish sanding.  Now for the inner brass wire frame and commence with wiring and final assembly.


Final assembly of base to uprights, taking care that right angles are kept.


Top center post drilled for lights and wiring commences.


Smoke test shows light without flame which is always a good thing.  I am using 1.5V GrainOfWheat bulbs and will power the light once in the room box with a stack of AA batteries in parallel so that it will stay lit for 3 or 4 weeks at the State Fair.


Once wiring has been certified I turned a brass finial that goes through the top of the shade into the upper part of the center post.  Here you can also see the 4 heat vent holes.


I still need to fix the middle plate to the posts, and museum wax the upper post and finial in place so that it is removable but stable, in case I want to change to LEDs or 12V GOW.  All that remains is to attach the lamp cord to the green wires inside the base, and fabricate a baseplate to cover the wiring.  A fake plug body where the wire will go through a socket plate to the batteries will complete the lamp build.

Lessons were learned that will speed the table lamp version should I go that route.  I have enough mica that I could even create a couple more for sale.

Stay tuned,  this one is fun. 


Thursday, June 5, 2014

1/12 Scale Hassock for the Morris Chair

I decided that the Morris chair needed a hassock for full reclining comfort should Stuart Little drop by.  A hard days work with the tools and workbench building his furniture is sure to wear a mouse out.

The frame is 4 shallow pyramided top posts and side stretchers and rails.  I made the stretchers and rails narrower than the ones on the chair and that decision may come back to haunt me when it comes to mounting the cushion support slats.  

Here the post mortises are routed and the side rails are gluing.  Once they are set I will assemle the frame with the stretchers after which the cushion supports get mounted, or the whole thing is scrapped and redone with wider stretchers and rails.

Ater that is done I get to sew and dye another leather cushion to match those of the chair.


Frame assembled, now to the slat support pieces for the sides, and cut some new slats.  These are fine if placed front to back, but the slats for the chair go side to side, so these are not long enough.


Slat supports cut and mounted, new longer slats cut and mounted, sanded and oiled..  It will look good with a matching cushion!


Next comes a cushion..  time to break out the treadle sewing machine!

After wasting three cushions worth of leather, I have one that looks good, so far.  I still need to hand sew the back side of it closed and dye it.


Back sewed, and dyed with 1:50 mix of dye.


Waxed to bring out the rich color and shine.


Hassock complete and ready for feet.


I think this build is at an end.

Thanks for putting up with the grainy iPad photos.

ONWARD!

In future build anticipation I ordered a supply of Russian mica sheets.  Turns out that these are used in electronics to isolate transistors.   It looks to be light brownish and if I laminate a couple i should get the darkness and opacity I need to do an Arts and Crafts lamp shade.  I have a plan and will attempt it shortly.  Which also leads to a need for a matching side table to put the lamp on...  and maybe a matching floor lamp.  I also have discovered some sources for orange shellac mica sheet which is the most common of the mica shaded lamp materials.

It never ends does it?  This is truly madness.


Monday, May 5, 2014

Microlux Drill Press Depth Stop Modification

Having an early Microlux drill press with no bells or whistles I found myself needing to drill multiple holes  of the same depth for scale shelf adjusting pins in the Mission Style Bookcase I am building.  The new X-Y table attachment and vise make linear evenly spaced holes much easier, and a depth stop is the only thing required at this point.

Not having any blocks of aluminum to make the mounts from, I used rosewood.  I drilled 1/4 inch holes in each for the support rod which is a 1/4 by 20 6 inch stove bolt.  I drilled holes in the faces of them for the 10/32 mounting bolts, then marked, drilled and tapped mounting holes on the side of the drill head.

Depending on how well this works I may replace the rosewood with aluminum blocks both for looks and stability.

Needing a foot to act as a quill stop I looked at what I had available and decided on a 1/4 inch thick piece cut off of an old Macintosh desk stand.


The cut off piece had a half inch hole bored and then was cut in half leaving a piece with a 1/2" half moon cutout to clear the drill shaft while stopping the quill.   A 1/4 inch hole was drilled for the stove bolt to go through  to mount it to the rod with double locking nuts.


A spring was added to the top end of the stove bolt to keep the foot in contact with the quill and out of contact with the spinning shaft or chuck.  Depth adjustment is by the nut and wing nut between the blocks.  The wing nut really decreases possible throw and both may be replaced with  knurled flat wheels.   One thing I did do after completing this was to take it back apart and put a length of shrink tubing, un shrunk, over the bolt inside the spring above the top block.  This stops the annoying threads against spring jangle when drilling, smoothing up the action.  See last photo.


Wednesday, April 23, 2014

1/12 Scale Mission Style Bookcase


23 April 2014

So begins another Fine Woodworking Magazine project.  This time it is a Mission Style Bookcase which I am building out of some nice mahogany that Topher Gayle was kind enough to send me.


The pieces have all been cut and thicknessed.  The original has movable shelves resting on pins in holes spaced 1' apart on the inner legs.  I have an X-Y table coming for my mini drill press and may attempt the holes once I get it installed.  

The original also has floating tenons between rails and posts, but I think I am going to cut tenons on the rails as usual  and use basic mortise and tenon joinery.  I will test my oil finish and others on some scrap to see what looks best.

The back is composed of boards with "ship lap" joinery which is basically the same as half lap joinery.  The back boards and side panels 'float" in the mortise grooves, and the back boards are not glued together which can give an uneven but authentic look.  I will make that decision to glue or not when the time comes

This will be considerably faster to complete than the Morris Chair was, although I will be away from my shop for the next three or four days.  This "kit" awaits my return.


I received the package I was waiting for and found that to mount it to the drill press table I would need a drill press, and an M4 metric die and 3.3mm drill...   Luckily Harbor Freight has a set of combination drill and tap that eliminates the need to change bits and the inherent wobble hand tapping seems to create.

I set my large press to as slow as it would go,  marked and center punched the hole locations per the diagram that came with it and proceeded.   The drill bit part made a clean hole, and when the threading tap portion made contact it self fed through the mini drill press table and deburred the hole with a tapered section at the top of the bit.  Turning off the press and loosening the bit allowed it to be unscrewed from the new hole.  Neat and clean!   I will take some pix and insert them here where appropriate later.


With a little practice I should be able to drill the shelf holes evenly spaced.  The numbered black dial on each knob is movable so once I get the spacing figured out and shrunk to metric I can zero the dial, drill a hole, turn the wheel however far I must for the next hole, zero the dial, drill and repeat over and over and over.  Each turn of the wheel equals 1mm and is graduated in 10'ths.

One thing I really need is a depth stop for this drill press.  If anyone knows a link to a tutorial  on modifying an early Microlux drill press to add a depth stop, please email me or message me with the link.  thanks...

9 May update..

After figuring out and building the depth stop (see the depth stop blog entry) I driled the shelf pin holes.


The next task was to attempt the half lap ship lap edges on the back boards.  I tore a couple up trying to run them under an overhead router.  The problem is that they are only 0.020" thick and to ship lap I needed to take off a small strip of half of that, or 0.010".

Today I clamped them under a hardwood block (future hand clamp body half) up against a 0.012 inch thick piece of aluminum with just enough showing to form the edge when scraped.


After turning them over the same thing was done on the other edges.  I chose the front sides and assembled the back with tape to hold the boards in place as I do not plan on gluing the back boards together at this point.  Dry fitting the rear posts and upper and lower rails gives me hope that it will look pretty good once all together.


Dry fit of sides and rails prior to mortising the fromt posts for the front rails.


Gluing bottom shelf in after gluing the front rails.


Blue tape removed.


Squaring up and gluing shelf, repeated for next shelf


Assembly complete except for small metal angle brackets beneath the shelves to emulate pinned brackets, and cutting and attaching the corbels.


The backs of the back boards are rough hewn looking which is not uncommon for a piece that will be against a wall.   The ship lap can be seen from this angle.


But not so much from this angle...


Corbels and shelf brackets installed.


I am hoping that the oil will mitigate the over application of cyanoacrylate near the brackets.


Final gluing of spline fillers in the dadoes on the bottoms of the legs.


After application of a coat of boiled linseed oil.


 It appears that the back and side wood choice was walnut and not the mahogany.  They came out a nice deep warm brown and have a nice contrast to the mahogany frame and shelves.


The under shelf brackets which are also on the front shelf corners.


Other than a future coat of carnuba wax or two once the oil has set, I declare this project complete!

What next?  Maybe another couple of these in solid walnut, solid mahogany, and solid oak.  I do have plans for an A&C lamp that would go nicely with this.  If it turns into a room box it will need some light.

Stay tuned!